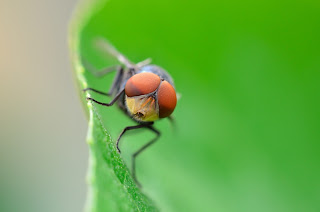
Focus In The Eye
No matter what the object is, humans, animal, or insects, there is a common principle that always put in photographers' mind, always put your focus point in the object's eyes. No matter how shallow DOF you get, always find DOF area in the eye. Why should eyes? Some people says, through eyes one's heart can be seen. And so in photography, focus in the object's eye will give the object's passion and expression to the audience.
In Macro Photography, when you took a picture of an insect, find the characteristics and texture of its eyes, once you've found it, then it will be easy to shoot and focus in its eyes.
 |
| Focus in the object's eyes increase the "feel" on an image, and also make it so alive |
Fast Speed
Macro Photography always deals with an object in tiny size. Usually my object only 5mm to 2 cm only in length, thus every movement you make, even only 1mm only, will give a big impact to the picture. To prevent any movement effect on the picture, such as shaking or blur picture, then fast speed shutter should be used. Fast speed can freeze the object and capture the moment in a focus and sharp picture (depends on how well you maintain the DOF area). I usually use 1/100 seconds as maximum speed while taking macro picture.
How I use fast speed when the aperture I set was so small? Use your flash. Flash can enlighten the object even you set the aperture small enough and the speed fast enough. I will explain how to use flash in next sub-topic.
Flash and Diffuser
Flash can help macro photographer enlighten the object. But, bare flash can't be used to macro photography. Since, the distance between object and camera is so close, the flash light will be harsh enough to destroy the image, detail and sharpness will be vanished from your image. Then how should I use my flash? You can use diffuser to cover up your flash. Diffuser is a cover to bounce the lighting, so the light from the flash fall to the object in a mild way.
You can buy diffuser from camera store, or you can make it at home. I made one of it, and always use it whenever I take macro photograph.
I made the diffuser from tissue box, and wrapped it with paper. And to place it on the camera, I made a hole below the diffuser and the flash built-in can be inserted through that hole. By using this diffuser, the light from the flash is bounced and diffused to another area. And in the end, you can get the detail and sharp image.
 |
| Harsh lighting reduced detail and sharpness on the face. Use diffuser to prevent harsh lighting |
Set your lens to manual instead of auto. Using auto focus, push the lens to hunt focus point that will be hard to find. Close distance make the lens hard to find the focus, since there is minimum focus distance. To make it easy, just use manual focus and try to find your focus point by moving forward and backward. At first, it will be hard, especially when you always depends on auto focus before. But, with enough practices, you will somehow understand the characteristics of your lens and definitely will find focus point quicker than before. All of my macro picture is taken by manual focusing, and the results are so good.
Tripod or Monopod
The last thing to help you get focus, detail and sharp image is using tripod or monopod. For macro photography, I suggest to use monopod, because it can move more flexible than tripod. And it's better monopod with ball head, so you can move in a circle freely.


